Supertags
Overview
Supertag = Turns a node into an object.
Use supertags to identify objects in your notes: Examples include #task, #meeting, #trip, #subscription, #person and so on. A good way to check if a supertag is right, is thinking “is a” when adding the tag to a node. A node with the contents “Marisha” is a #person. Oslo is a #city. With an eye for “what things come up in my notes that need to be remembered, organized or actioned”, these are good candidates for a supertag.
Supertags are the beginning of creating collections of objects, like a database: Anything you would make a list, collection or database for, these are good supertag candidates. Each row in a database represents one node. Each column represents the Fields of those nodes.
Supertags give you tools to structure the information of the object: Every time you apply a supertag to an item, it populates with default Fields and Nodes of your choice, to help you organize all important and related information regarding this item. If it is a person, adding a Field for their Phone Number and their Preferred Name might be handy. If it is a todo, you may want a Field with the Due Date. See more under Supertag configuration panel.
Basics
- When you tag something, unlike traditional tags that signal that the content is related to the tag, in Tana the content is the tag. For example, "buy milk" is a #task. Therefore, supertags apply to the whole node.
- This means that you can define objects in your notes, and give them special attributes based on what they are. Tasks can have Due dates. People can have Nicknames. Projects can have Statuses. These attributes are saved as Fields in the Template.
- Supertags can be used on any node, and gathered at any time using Search nodes. If you remember to supertag your important stuffs, our powerful search nodes will ensure that everything resurfaces again in an instant, no matter where they are in the graph.
- Click on a tag and you’re taken to a Supertag page. By default it creates a search looking for all nodes with this supertag in the graph, shown as a table. That said, you can adapt the Supertag page however you want by adding tabs and additional views of relevant information.
- In the Supertag page, click on the wrench button on the top right to get to the Supertag configuration panel. (Note: you can also get to it by holding Cmd/Ctrl+Shift+click on any supertag)
Documentation
Create a supertag
On any node, typing # will bring up the Supertag menu. Continue typing the name of the supertag to either make a new supertag (always the top answer), or find an existing one that matches what you’re typing.
On any node, use the Command Line Cmd/Ctrl+K and type Convert to supertag. This converts the node to a Supertag definition turning the node name into the supertag name. This command will also take the child fields and nodes and make them into template items.
When you create a supertag, by default it sends the original Supertag definition to Schema.
Add/remove a supertag
To add a supertag, anywhere in a node, type #[name of tag] and hit Enter to apply it to the current node.
To remove a supertag, hover over the tag and click the x that shows up.
Both actions can be done via the Command line (Cmd/Ctrl+K):
- "Add tag"
- "Remove tag"
Delete a supertag
Before you delete a supertag, consider whether it has been applied to any nodes. In the Supertag configuration panel, scroll down and see the stats on how many nodes it’s been applied to.
- If you have used it on 0 nodes, it’s fine to just delete the supertag.If you have used it on 1 or more nodes, consider finding all those nodes and untagging them before deleting, or if it’s being replaced by another tag, merging the old tag with the new tag.
- When you delete a supertag that is applied to other nodes, these nodes will show a trash can icon. This follows our principles about Deleting Nodes, Supertags, and Fields that have references elsewhere, which states that Tana will never delete data that is indirectly associated with another element that you delete.
How to delete a supertag:
- Option 1: Go to Supertag configuration panel. At the bottom there’s an option to Delete the tag.
- Option 2: Find the original Supertag definition and delete it.
Configure a supertag
There are two places you can configure supertags from:
- Supertag page - go here for basics like finding all supertag instances, adding fields,
- Supertag configuration panel - go here for the full range of options
Supertag page
When you click on a supertag, you’re taken to the Supertag page.
This page by default will be set in Tabs view, and show you a table of all supertagged nodes on the first tab.
You can do basic configuration of the supertag here like adding columns (which are fields) and saving them to the supertag template using the ✨Suggestion that pops up.
You can also add other tabs with different views that you want accessible on the supertag page, such as instructions on how to use the supertag, search nodes with different default views, or a reference to any node you might find useful to access while looking at the supertag page.
Supertag configuration panel
To open the config panel:
- Click the wrench on the top right of the Supertag page
- Cmd/Ctrl+Shift+click on a supertag
Colors
There are 12 colors available for supertags plus colorless (grey) to pick from.
Template
The supertag template is where you add fields, search nodes and regular nodes that will show on every node with this supertag.
There are several ways you can add template objects in the Supertag template section:
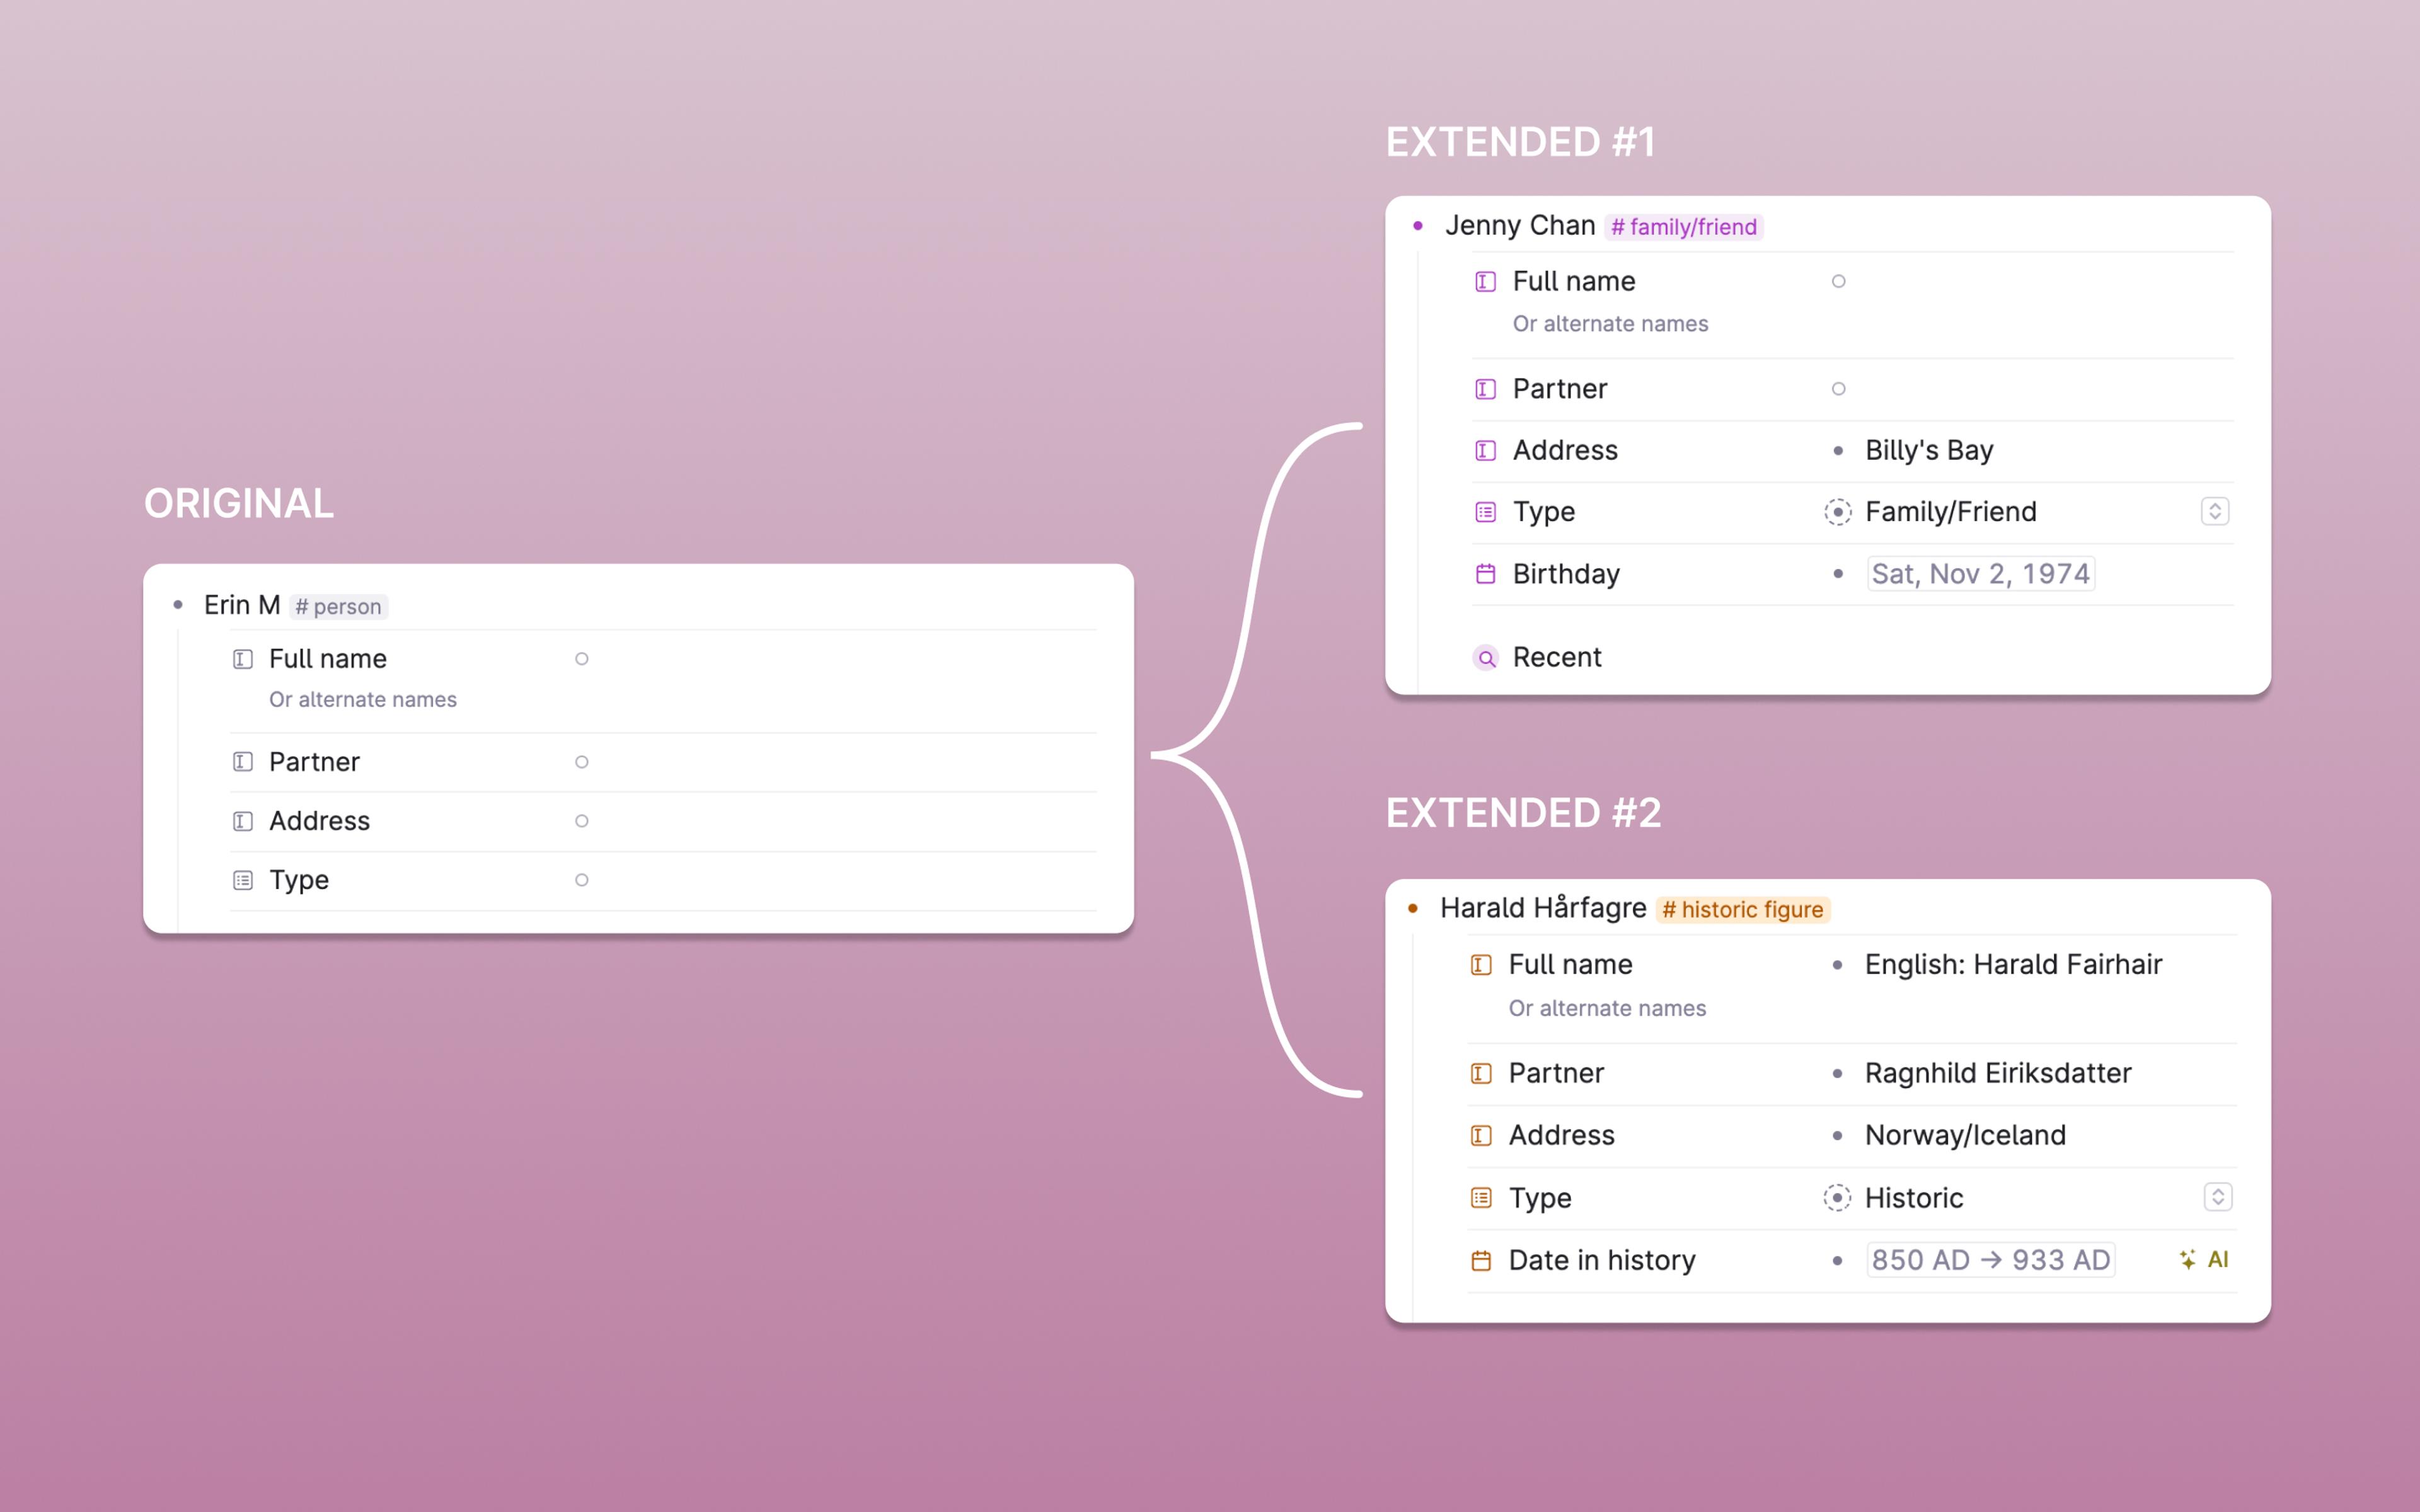
—Extend
Pick a supertag from the list that you want the current supertag to inherit template objects from. This allows you to set different default values, and also add template objects for greater specificity.
Example: A basic #task tag has the >Due date and >Project fields.
- You can create a #design-task that is extended by the #task tag, then set the default >Project value to "Office Renovation".
- You can also add a new field, >Reno team, so you can add individuals and teams that these tasks be assigned to.
—Add fields
Fields become attributes to the supertag object. Examples:
- a
#taskcan have fields like Status, Deadline, Priority, Team, Assignee - a
#clientcan have fields like Company name, Email, Point of contact - a
#projectcan have fields like Timeline, Lead, Team, OKRs, KPIs, Stage, Priority
Add fields: Type > at the beginning of a new node to add a new field. See Configuring a field on how to edit fields.
Add fields ad-hoc: Add a field under any tagged node (that isn't already part of the template), then right-click the field name > Add to template
Set default values for fields: Fill out the field value in the supertag template. Example: New #task always has >Status: Inbox
Set auto-initialize functions in fields: These will insert a field value, created at the moment when a supertag is applied to a node. Auto-initializations will trigger under the following conditions:
- when the tag is applied to a node. In other words, if it already is applied, it needs to be removed and applied again for the auto-init to work
- if the field doesn't exist already
Also, see: Auto-initialize
—Add search nodes
A search node can customize its results based on the supertag instance. Example:
- a
#projectthat looks up related#tasks - a
#personthat looks up related#meetings - an
#authorthat looks up related#books
Make a search node:
- Command line (Cmd/Ctrl+K) -> Find nodes
- Type ? and click on ✨Create search node
See Query Builder for more on customizing your search.
—Add nodes
Add nodes just by typing them in. You can also add references to nodes.
Template node states
Template nodes have two states:
- Dependent - They are connected to the template object still (i.e. they don't have their own nodeID)
- Independent - They are disconnected from the template object (i.e. they have their own nodeID) because they've been edited in some way.
Dependent template nodes
Template nodes that are still dependent will change in sync with changes you make to the supertag config.
Template objects are similar to a projection, in that they are visible but not material. This means that template nodes cannot be searched, since they don't have their own unique nodeIDs separate from the template.
Independent template node
If template objects are edited, they instantiate as a separate node, receive a unique nodeID and will no longer be updated with template changes.
A template object from a supertag is considered edited if the following has happened:
- It was edited in any way, even if you write and delete its contents fully
- Field initiation was triggered
- Its view options were changed
- Getting a link or copying it, because it then needs a unique nodeID
Only a hard delete (Cmd/Ctrl+Shift+Backspace will clear the independent node, resetting the template node,
To “reset” a template node
- do a hard-delete (Cmd/Ctrl+Shift+Backspace) to clear out the edits and populate it with the current template. If you already had content there that you want to save, move it out of the way first before doing the hard delete.
Optional fields
Optional fields allow you to specify which fields you use sometimes in a supertag.
This means you can add only the most important fields to your supertag template, while you move the rest to optional, ready to go when you need them.
To add optional fields:
- Supertag config: Add a field in the Optional fields section right beneath the Supertag template
- Add an ad-hoc field - twice: Add a field under any tagged node. If you add it again a second time under another node with the same tag, it automatically gets added as an optional field.
- AI-enabled suggestions: If you use AI in Tana, fields will be automagically suggested for any new supertag you create.
- Demote from template: Right-click on a field that is part of a supertag template, and choose
Make optional
Once optional fields have been added, whenever you use that supertag again, the optional fields will be suggested in the following ways:
- Button next to the tag
- Suggested fields widget (appears only for a little while, then disappears after 24h)
- Slash command inside tagged node
Show as checkbox
Turn this on to show a checkbox on all tagged nodes.
Done state mapping
Optionally map the checkbox state to one or more field values. This creates a two-way connection between a field value and the checkbox state. If you check/uncheck the box, the field value changes to the value you specify for either state.
Insert fields using >, and select the values for each state.
Build title / title expression
Build the title of a node from the values of its fields. Title expression are set in a supertag called "Build title from fields", and will apply to all its instances.
Title expressions composes field values from the node into a title using this the format: ${field name}
The title expression uses the actual name of the attribute.
You can also write between the fields, it could look like this; ${Objective} with the team at ${Date}
The existing name of the node can be accessed through ${name}. Note that if the title expression begins with ${name}, you will be able to edit the first part of the title directly on the node. In any other case, the node title will be locked for editing (even if ${name} appears later in the expression)
You can also specify a max length using ${field name|30…} which will show only the first 30 characters of a value.
Choose whether you want the placeholder to appear if the field is empty by appending a ? - either ${field name|?} or ${field name|30…?}.
In fields that have a list of nodes as values, we include all field values, not just the first one.
System attributes available in the title expression:
- ${cdate} and ${ctime} - Created date and time in UTC, i.e. not local time)
- ${mdate} and ${mtime} - Modified date and time in UTC, i.e. not local time
- ${sys:description} - Description field
- ${sys:createdAt} - Time of creation
- ${sys:lastEditedAt} - Time of last edit
- ${sys:lastEditedBy} - User who last edited the node
- ${sys:editedBy} - All users who ever created/modified the node
- ${sys:owner} - Parent node
- ${sys:dateFromCalendarNode} - The calendar node this node belongs to (Calendar date system field)
- ${sys:doneTime} - Date and time this node was marked done
Navigation shortcuts
Nodes here are the same nodes that exist on the Supertag Page (see above)
Set child supertag
If you want to have a default supertag applied to all child nodes of any instance of this supertag, you can set the supertag you want here. This supertag will be applied to all new children.
Supertag definition
What is a Supertag definition?
When you create a new supertag, a node is created that stores the configuration of this supertag. This is the Supertag definition and includes its name, template, and commands that show up as buttons, among other things. You access the settings of the supertag via the Supertag configuration panel.
How to find the Supertag definition?
There are two situations where you’ll encounter needing to use supertag nodes:
- Creating a Search node
- To find it here, just type “#” in the search expression editor and Tana will look for every supertag in accessible workspaces
- Creating a Tana Template
- To find it anywhere else, type “@#” and the name of the supertag. Supertag definitions show up in their color and hashtag at the front.
Merging supertags
Related release notes
- improvedAfter a lot of community feedback regarding recent changes we made to field availability in autocompleter based on where they lived, now letting you also retrieve fields that are owned by other supertag templates in field auto-completer ()
- fixedTag filtering search now respects "Allow from" ()
- fixedFixed bug where fields from the tag you are configuring did not show up when configuring Done state mapping. We do not like no-shows. ()
- improvedYou can now promote a field to the supertag template using the node toolbar. (Press ESC with caret on the field) ()
- improvedWhen we apply grouping on tags, if there are several we now look at the first set tag. ()
- fixedFixed lost spacing in title expressions when viewed as cards. ()
- improvedYou can now remove a banner image or icon that comes from a tag directly from the instance, or set a banner image or icon as a default banner image/icon for a tag, directly from an instance ()
- fixedFixed done state mapping in supertag config where fields were not rendered properly ()
- improvedYou can now right-click to remove a banner image from a tag from any node with that supertag. ()
Related FAQs
- How can I add supertags on things that I send from Tana Capture?
While it isn't possible to tag things when you're sending things from Tana Capture, you can have Tana do some post-processing magic to convert written-out tags to real tags once they arrive the Inbox—no AI needed! This method uses a simple Tana Paste command that you can run on the Inbox node, which targets all new children that have "#" in them
Here's Theo describing the solution:
"All it does is paste the nodes that have # in them and that are not tagged, using Tana Paste.
Say we add this through Tana Capture:
buy milk #todoThe command will paste that exact text back in with Tana Paste, where ${name} is buy milk #todo and ${sys:content} is very important child note. Using Tana Paste #todo is added as a tag
Note: this creates a new node, so the created date will change, meaning you’ll lose the time that the node was captured through Tana Capture."
Related docs:
- How can I configure the view of a search node that exists in a supertag template? It's not showing me all options.
Problem
The query doesn't run in the template editor and so there are no search results available with which to set sort or group options.
Until we have fixed this issue, this is a workaround that has been perfected by community member Darren Brierton (this is part of the new series called Darren's Frequently Answered Questions, or the D'FAQ if you may).Answer
- Create the search on the actual node, and adjust its options there.
- Then, open Filter and fill the text filter with gibberish (like "
xyjzkwq") so the search node returns zero results - Then, cut and paste (Cmd/Ctrl+X / Cmd/Ctrl+V) the search node into the supertag template
- Expand the node, and remove the gibberish text
Are the gibberish text instructions necessary?
The reason why the filter instructions are needed is because it prevents stale results from being copied over to the supertag template.
Thank you Darren for drafting these thorough instructions until we sort things out!
Related docs:
- How can I find all tags that extend a tag?
One way is to create this search node:
- >system field Tags : #tag (use supertag that was extended)
IS TAG
Example:
Related docs:
- How can I use system fields in Title expressions/Build title from field
Calculated system fields are prefixed with
sys:to avoid being mixed up with user-created fields with the same name.Calculated system fields and their respective title expressions can be found here.
Related docs:
- How do I create a relational database in Tana like in Notion or Airtable?
Because Tana is a graph, building relational databases is easy.
Think of
supertagsas databases, andfieldsas columns in a databaseLet's use an example:
- You have two supertags:
#personand#project. You want to relate the two by assigning a team lead to each project that draws from person. - To relate each project to one team lead, we can make an Instance field called
Team leadin the project. This allows us to select the#personsupertag so this field will now create a dropdown of options from every instance of the person supertag. - Now, every time you assign a team lead to every project, on the other side you can look at a person and see what projects they are noted as Team lead for in the Reference section.
There are many other ways to relate one database to another in Tana that go beyond what relational databases can do. That's because all information in Tana is stored as a graph, and on top of this we have flexible ways to build schemas with supertags and fields. It's everything a relational database has, with much more freedom and flexibility in the long run.
Related docs:
- You have two supertags:
- How do I share a supertag from my private workspace to a shared one?
Currently, the easiest and most foolproof way to do this is to not share it but instead build the supertag, with its fields and anything else necessary for the supertag to work, from the ground up in the new space.
That said, if you still want to move a supertag over that exists only in your private workspace, the main work is to ensure that there's nothing in the supertag that references something in your private workspace, otherwise it will appear as broken to others once it's moved.
It's like packaging up a zip file. You can't just zip up a bunch of shortcuts, you need the real files in there or the recipient will only see broken shortcuts.
You'll also have to remember to move over other things like field options, commands, and ensure that no saved view options contain elements from your workspace. Basically, you must ensure that nothing you're moving over from your workspace contains references from your workspace.
To bring all nodes (except system nodes) into the supertags, fields and commands you want to move, use the command "Bring referenced node here". Alternatively, you can move each necessary node separately too if you foe example want the field definition to exist outside the supertag. But the key is that everything that is connected to what you're sending over gets sent over too, otherwise there will be missing pieces.
Related docs:
- How to use Tana Paste with supertags that have non-alphanumeric characters?
Tana Paste can usually parse supertags that are one word, such as
#task. If a supertag has spaces, numbers or irregular characters, try wrapping the name in double brackets like this:#[[1'3$4'6]]If you want to grab the supertag definition, include the hashtag within the brackets, like this:
[[#1'3$4'6]]Related docs:
- I'm unable to delete nodes/fields in the supertag config, what's going on?
The tag might be extended, which means that it's inheriting fields from another tag. Check right above the supertag template to see if it has been extended:
Related docs:
- My supertagged nodes are not updating with the latest changes I'm making! What's going on?
Supertag template nodes are directly connected to the template until the moment you edit or make a change to them in the instance.
Editing them in any way separates them from the template, and any change you make to the template will not reflect on edited template nodes. This is part of Tana's way to never destroy information you have touched and edited.
To refresh template nodes with the updated ones from the supertag template, consider first whether you have content you want to save, and move them out of the template element first. Then, perform a hard delete (Cmd/Ctrl+Shift+Backspace) to clear the stale node, and the template will immediately repopulate it.
Related docs:
- What does the system field "Number of nodes with this tag" do?
This system field is relevant only for supertag objects, and reveals the number of times a tag has been used.
How to use it:
- Make a search node with
IS TAG- which will find all supertags in your graph - Display: Number of nodes with this tag
It shows you how many nodes the tags have been applied to.
Related docs:
- Make a search node with
- What does this warning mean: "Fields nested under other nodes or fields will not work as expected"?
This warning pops up in the supertag template when there are fields that are indented (another word for nested).
There are several "expected" behaviours of fields in supertags that only work when they are first-level nodes in the template, such as (and not limited by) the following:
- Searching for nodes based on their field values (all #tasks with Status::Complete)
- Viewing the node as a table, with fields as columns
- Using fields to build title using title expressions
If you do not care for any of the above uses, you can safely ignore the warning.
Related docs:
- What is the difference between supertags in Tana and hashtags used in social media?
Here's a comparison between hashtags and supertags:
- Primary function
- Hashtags: identify
keywordsandtrendsthat are relevant to a piece of content - Supertags: identify
itemsandentriesin one's data or knowledge-base
- Hashtags: identify
- Placement
- Hashtags: Can appear anywhere in the content
- Supertags: Applies to the whole content (node), always appears at end
- Search
- Hashtags: Finds all content tagged with that hashtag across the platform
- Supertags: Similar to hashtags
- Value
- Hashtags: Connects users to the broader conversation across the platform
- Supertags: Connects users with their own content, improving knowledge management and retrieval
- Shorthand
- Hashtags: "This content is related to X"
- Supertags: "This content is an X"
- Examples
- Hashtags:
- Example: This content relates to [#topic1, #topic2]
- #TaylorSwift
- #ErasTour
- #BlankSpace
- Supertags:
- Example: This item is a #[type of item/entity]
- Taylor Swift #artist
- Eras Tour #event
- Blank Space #song
- Hashtags:
Using supertags this way is a good starting point for getting to know them. Once you become more familiar, it's not a problem if you want to break the rules and use supertags like hashtags - as long as you know what the tradeoffs are and why you are doing this.
Related docs:
- Primary function
- Why is my field not auto-initializing?
How auto-initialization works
There could be several reasons why a field isn't auto-initializing.
Currently, field auto-initialization is triggered only on the event where
- a supertag is applied to a node, and
- the field is in a placeholder state (i.e. doesn't exist/have its own nodeID).
Fields will therefore not auto-initialize under the following events:
- 1. When added anywhere as a solo field
- 2. On nodes where the supertag is already applied and the field is added after the fact
- 3. If the field is nested under a node in the supertag template. Fields have to be direct children to the supertag to auto-initialize
The next question is likely: can I trigger auto-initialization somehow?
As a result of how initialization is triggered today, there is an unintentional quirk that can be used to re-initialize fields.
For fields that fall under category 2 (from the list above), it is possible to trigger initialization by applying any supertag to the node. The fields have to be in a placeholder state, or it won't work. Video demo:
Related docs: